Harvest Prayer

I find harvesting to be one of the most satisfying activities for a number of reasons. The most obvious is reaping what you sow, and the less obvious and equally rewarding is the way in which it puts one’s mind to rest.

The combination creates an experience that is uplifting and gratifying like none other. I have discovered over time that dropping into the spaciousness of “being in the moment” can be done with ease while harvesting. Getting close to a plant requires getting down to ground level and this act of kneeling and squatting is deeply cathartic. Grounding oneself literally on the earth is the first step, the second is feeling your way into the activity. This requires some mental stimulation but once you get the swing of things you can drop into auto mode and free the mind. It’s in this state of present moment awareness that time slows down and almost simultaneously surrounding sounds become louder and more acute. Awareness to one’s surroundings and the subtleties of aroma and feeling are pronounced. It’s here at the juncture of timelessness where the breath is a rhythmic exchange of energy with all elements.

The carrots we are harvesting this Winter of 2023 are keeping us all entertained! When harvesting can be shared alongside others a communal vibe gets going and work turns immediately to fun engagement and the work at hand goes so much quicker and with that much more ease. 

Thank you carrots and all of the amazing produce we got to harvest from our beautiful farm this year!

Three Classic Eggplant Recipes

At some point we’ll sit down and compile a recipe book from all of our inventions. Behind the scenes, Eric is a master at combining flavors and creating delicious seasonally inspired dishes. If you haven’t enjoyed one of our Pop-Up Dinner events (previously Thriving Thursdays, then Foodie Fridays) you’ll want to sign up for a table. The next one is September 9th, and then another October 14th. Menu’s are not out yet but booking page is up and running. Pop-Up Dinners 2023

BBQ ROASTED HALF EGGPLANTS

The Prosperosa Eggplant is the only one we grow! It’s texture is creamy, with caramel overtones when cooked to perfection! And that there is the key to winning over an eggplant lover’s heart. Even those unfortunate folks that reject eggplant as a “rubbery” vegetable will be stunned by it’s texture and flavor!

Just perfected and super easy to do, this recipe hands down is a summertime favorite. Simply slice off the calyx stem end. Keep the skin on and cut through the middle from top to bottom. Peel some of our amazing Creole garlic, slice finely and saute in a little olive oil until softened. Cut incisions into the flesh of the eggplant and stuff those garlic pieces firmly down. Slather with a little olive oil and get ready to put on the grill. Place the halves skin side down and cook until the surface bubbles and flesh is tender and creamy. That’s it! You could drizzle over some balsamic or sprinkle some herbs too!

ERIC’S SKILLET EGGPLANT PARMESAN

Takes 10 minutes to prepare and 15 minutes to cook. Ideal warm or cold in a sandwich.

1 Globe Eggplant

1 Early Girl Tomato

2 cloves garlic

½ bunch of Sweet basil

cheese – Mozzarella, Swiss, parmesan

Slice eggplant into rounds, ½ inch thickness – you can keep the skin on for this one. Cook in skillet with olive oil until browned. Flip eggplant over and place a slice of tomato, squeeze of garlic, slice of cheese and leaves of basil. Place a lid on the skillet. Cook 10 minutes until underside is browned.

ASIAN EGGPLANT AND CHERRY TOMATO PASTA DISH

4-5 Asian eggplants

1 basket of cherry tomatoes

1 bunch basil

4 cloves garlic

Pasta of your choice

Parmesan cheese

Slice eggplants diagonally and saute on stove top until browned on both sides. Slice cherry tomatoes in half and marinate with olive oil, garlic and chopped basil. Combine eggplants and cherry tomato into pasta, with Parmesan.

Rustic Eggplant Moussaka

epplant moussaka-227

While searching through Pinterest for some inspiration with all of our delicious eggplant coming from the garden, I came upon this  great recipe and it’s associated blog (www.feastingathome.com).

I love the combination of eggplant and lamb, although one could easily eliminate the lamb and use another vegetable for it’s filling. Personally, my choice would be winter squash cut into cubes and steamed, then combined with the other ingredients in the recipe.

Rustic Eggplant Moussaka
A traditional Greek Eggplant Moussaka recipe.
Ingredients:

3 lbs Eggplant ( 2 extra large or 3 eggplants)
3 T olive oil or cooking spray

Meat Sauce:
2 T olive oil
1 large onion diced
4 cloves garlic, rough chopped
2 lbs ground lamb, (or use vegetarian ground meat substitute Gimme Lean or St Ives Meatless Ground.)
1 1/2 C diced tomatoes ( canned is OK)
2 T tomato paste
1/2 white wine
2 T fresh chopped parsley
1 tsp sugar
1/2 tsp cinnamon
1/2 tsp kosher salt
cracked pepper

Bechamel Sauce:
3 T butter
4 T flour ( or rice flour)
2 C whole milk
1/2 tsp nutmeg ( use fresh grated if possible)
1/4 tsp kosher salt
1/8 tsp white pepper
1/4 Cup grated Parmesan, Pecorino or Kefalotiri Cheese
1 egg, lightly beaten

Cut eggplant into 1/4 inch thick rounds( no thinner). Sprinkle with a little kosher salt and let sit in a colander or bowl for 1 hour. Eggplant will start to release liquid. Rinse well, pat dry and brush each side with olive oil ( or use spray oil). Place on a greased sheet pan and roast in a 400 F oven until golden, about 20-30 minutes.

Make Meat sauce:
Saute diced onion in oil on med high heat for 3-4 minutes, add garlic, turn heat down to med low and saute for 8-10 minutes until onions are tender. Add ground lamb, turn heat up to high and brown, stirring often, about 15 minutes. Drain fat if any. Add the rest of the ingredients, stir and cover and let simmer on med low heat for 20 minutes.

Make Bechamal:
Melt 3 T butter. Whisk in 4 T flour ( or rice flour) and let cook for 2-3 on med heat, stirring often. Whisk in 1 C milk. Whisk well, and add 2nd cup. Stirring constantly bring to a boil, and let simmer on low for an additional 2 minutes. Remove from heat and add nutmeg, 2 T Cheese, salt, pepper. Set aside to cool. In a separate bowl, lightly beat an egg, but do not add it just yet.

Assemble:
Divide eggplant slices into three stacks, reserving the best looking largest pieces for the top an bottom layers. The others can be placed in the middle layer which will be concealed. In a greased 8x 13 in pan, place one layer of eggplant. Add half the meat sauce. Add another layer of eggplant, and the remaining meat sauce. Add the third and final layer of eggplant. Whisk in the beaten egg into the bechamel sauce until nice and smooth. Spread the bechamel over the final eggplant layer. Sprinkle the remaining cheese and place in a 350F oven for 50-60 minutes, until beautiful and gold. let stand 10 minutes before serving.

Prep time: 2 hours Cook time: 1 hour Total time: 3 hours Yield: 6-8 servings


Grilled Peppers with Saffron Vinaigrette

This makes for a good mini salad in a multi-course meal, or try it over crostini for an appetizer you can make ahead and keep in the fridge waiting for the moment to strike. It also just has a lot of yummy tips for how to best bring out the flavor in peppers, and the dressing is a fantastic addition to your repertoire. This recipe is from one of my favorite books: Vegetarian Cooking for Everyone (by Deborah Madison, which my family lovingly refers to as the family potluck bible. If you’re interested in canning those peppers from the market and save Summer for the coming Winter, check out this old time method.

Directions:

Grill and peel a selection of different-colored bell peppers (directions below), allowing 1/2 pepper per person. Be sure to reserve any juices that collect in the bowl while they’re steaming.  Slice the peppers into halves or quarters, scrape out the seeds, and layer the peppers on a platter. Make Saffron Vinaigrette with Basil (see recipe below), adding any reserved pepper juices. Toss the peppers with vinaigrette to moisten and serve garnished with sprigs of basil and Nicoise olives.

How to grill and peel peppers:

roasted peppers
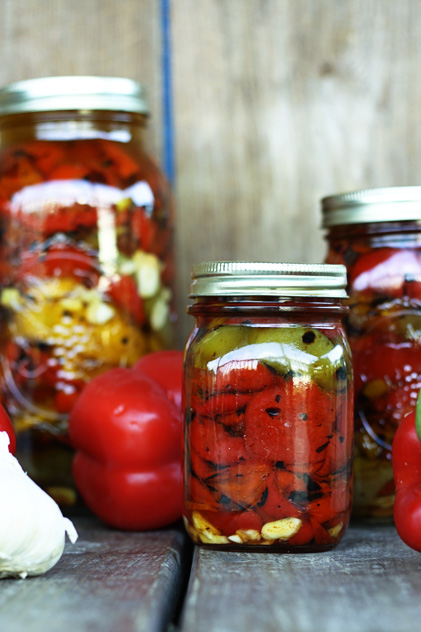
Place whole peppers directly on a gas burner (on your stovetop) or on the grill. Roast the peppers until the skin becomes wrinkled and loose, turning them frequently with a pair of tongs. If you want the peppers to be soft and slightly smoky, roast them until the skins are completely charred. Set the peppers in a bowl, put a plate on top, and let them steam at least 15 minutes to loosen the skins.

If you wish to grill bell peppers without peeling them, slice off the top of the tip of the pepper, open it up, and remove the veins and seeds. Brush with olive oil and grill, skin side facing the fire, until the skins are puckery and lightly marked but not charred. Turn the grill on the second side for a few minutes, then remove and season with salt and pepper. Leave the peppers in large pieces or cut them into strips as desired.  Skinny peppers and chiles can be brushed with oil, grilled whole until just blistered, then sprinkled with salt.

Saffron Vinaigrette with Basil

For a saffron lover, this dressing will become a favorite. Use it with summer vegetables- roasted peppers and potatoes, grilled zucchini, tomato salads, grilled fennel. Or add finely diced tomatoes to the dressing and spoon it over grilled or roasted eggplants.

oil with saffronIn a bowl, combine 3 tablespoons fresh lemon juice, 2 teaspoons snipped chives, 1/2 teaspoon grated or minced orange zest, 1/4 teaspoon of salt, and a few grinds of pepper. Warm 2 tablespoons of oil right over the heat in a small measuring cup, crumble in a pinch of saffron threads and let stand for a few minutes. Add this oil to the dressing and whisk in 6 more tablespoons of olive oil, Add 2 tablespoons of snipped or torn basil leaves just before using. Makes about 1/2 cup of dressing.

Corn on the Cob: 7 Flavorful Ways

Perfectly cooked grilled corn 

  1. Heat the grill to medium.
  2. Pull the outer husks down the ear to the base. Strip away the silk from each ear of corn by hand. Fold husks back into place, and place the ears of corn in a large bowl of cold water with 1 tablespoon of salt for 10 minutes.
  3. Remove corn from water and shake off excess. Place the corn on the grill, close the cover and grill for 15 to 20 minutes, turning every 5 minutes, or until kernels are tender when pierced with a paring knife. Remove the husks and eat on the cob or remove the kernels.

Chili Lime Honey Butter
Mix 6 tablespoons softened butter, 1 tablespoon lime juice, 2 teaspoons of honey, 1 teaspoon chili powder and a dash of cayenne pepper in a small bowl. Slather on hot corn on the cob, then sprinkle on some salt and give it an extra spritz of lime.

Blue Cheese Chive Butter
Mash together 4 tablespoons softened butter with 4 tablespoons crumbled blue cheese. Stir in 2 tablespoons finely chopped chives and 1/2 teaspoon ground black pepper. Spread on hot corn on the cob.

Herb Vinaigrette
In a small bowl, whisk together 1 tablespoon Dijon mustard, 3 tablespoons red wine vinegar, a hefty pinch of salt and black pepper, 3 tablespoons olive oil and 2 tablespoons chopped fresh thyme. Drizzle over the corn.

Cheesy Cilantro Chili Pepper
Slather cooked corn with 1 tablespoon of butter, then sprinkle each cob with chili powder, cotija cheese, fresh chopped cilantro and finish with a spritz of lime juice

Smoked Feta and Pepper
Finely crumble 1/2 cup smoked feta cheese. Mix in 2 tablespoons finely chopped pickled jalapeno peppers. Coat each hot ear of corn with butter, then roll in the cheese and pepper mixture.

Honey Ginger BBQ Sauce
Combine 1 1/2 cups apple cider vinegar, 1/2 cup mild honey, 1/2 cup ketchup
1 1/2 tablespoons hot sauce, 4 large garlic cloves (minced), 2 tablespoons minced peeled ginger, and 1 teaspoon salt and briskly simmer, uncovered, stirring occasionally, until thickened and reduced to about 1 1/4 cups, 25 to 30 minutes. (Stir frequently toward end of cooking to prevent sticking.) This is an excellent BBQ sauce, but keep going with the corn on the cob recipe by brushing the mixture onto the cobs just 1 or 2 minutes before they’re done on the grill. Oil the grill beforehand and it shouldn’t stick.

Jerk Grilled
Whisk together 1 tablespoon water and 2 tablespoons molasses. Using a pastry brush, lightly coat 4 ears of corn with the molasses mixture. Sprinkle all over with purchased or homemade jerk seasoning. Grill over indirect heat on well-oiled grates until tender.

Simple Mushroom Gravy

by Love and Lemon

Prep Time: 15 minutes mins

Cook Time: 30 minutes mins

Total Time: 45 minutes mins

Serves 4

Take your mashed potatoes to a whole new level with this rich, savory mushroom gravy! It’s fantastic on these garlic mashed potatoes as well as my mashed cauliflower and parsnip puree. Vegan.

Ingredients

  • 1 tablespoons extra-virgin olive oil
  • 0.5 shallot, finely chopped (⅓ cup)
  • 8 ounces cremini mushrooms, sliced
  • 0.25 tablespoon tamari
  • 1 garlic cloves, minced
  • 0.75 tablespoons fresh thyme leaves
  • 0.25 tablespoon chopped fresh rosemary
  • 0.13 cup all-purpose flour
  • 1.5 cups vegetable broth
  • Sea salt and freshly ground black pepper

Instructions

  • Heat the olive oil in a large skillet over medium heat. Add the shallot and cook until soft, about 4 minutes. 
  • Add the mushrooms and cook until soft, about 8 to 10 minutes. Stir in the tamari, garlic, thyme, and rosemary. Sprinkle the flour over the mushrooms and stir for 1 minute. 
  • Add the broth and simmer until thickened, whisking often, about 20 minutes. Season with salt and pepper to taste.

SEASONAL RECIPES & HIGHLIGHTS

Cooking is an art and the basis of good cooking are the ingredients. Ingredients matter! – we often hear ourselves saying to clients that hire us to cater their events – “that we use only the freshest ingredients, primarily from our farm and that is why our food tastes so good.” It’s simple and it’s true. You’ll find plenty of recipes that highlight the seasonality of eating – the simpler they are the better! Enjoy!

Tips to Making the Best Basil Pesto

So, what makes a good pesto? It should be several things all at once: rich, zingy, light, luxuriant, earthy. A good pesto is bright, It should reflect each of the ingredients in it, all in one spectacular and assertively flavored moment. It should be pungent from the cheese and garlic, and rich from the olive oil. It should have a mellow, earthy tone from the pine nuts. It should be vibrant and fresh tasting owing to the basil. It should be a memorable flavor. Pesto is not a sauce that stands by the sidelines.

Here’s a trick to help keep the color bright and green: You don’t want to add too much heat to the pesto ingredients with the whizzing of your food processor’s blades. Avoid excess heat by freezing the removable blade in the freezer for an hour before making your pesto. Instead of the gradual process above, add all of the ingredients at once and pulse until it has come together for a perfect pesto. Scrape the sides of the bowl inside if needed to re-incorporate any flying basil leaves.

Good quality ingredients are important. You’ll find all of the ingredients at the Farm Stand – the basil (fresh from the farm), garlic (just harvested and amazing flavor), salt, EVOO, Parmesan, and nuts – usually pine nuts but can be replaced with raw almonds (most neutral) but you can use other nuts too – roasting them beforehand will bring out that distinct flavor.

BASIL PESTO by Cookie and Kate

INGREDIENTS

  • ⅓ cup raw pine nuts, almonds, walnuts, pecans or pepitas
  • 2 cups packed fresh basil leaves (about 3 ounces or 2 large bunches)
  • ¼ cup grated Parmesan cheese
  • 1 tablespoon lemon juice
  • 2 cloves garlic, roughly chopped
  • ½ teaspoon fine sea salt
  • ½ cup extra-virgin olive oil

Cook Mode Prevent your screen from going dark

INSTRUCTIONS

  1. (Optional) Toast the nuts or seeds for extra flavor: In a medium skillet, toast the nuts/seeds over medium heat, stirring frequently (don’t let them burn!), until nice and fragrant, 3 to 5 minutes. Pour them into a bowl to cool for a few minutes.
  2. To make the pesto, combine the basil, cooled nuts/seeds, Parmesan, lemon juice, garlic and salt in a food processor or blender. With the machine running, slowly drizzle in the olive oil. Continue processing until the mixture is well blended but still has some texture, pausing to scrape down the sides as necessary.
  3. Taste, and adjust if necessary. Add a pinch of salt if the basil tastes too bitter or the pesto needs more zing. Add more Parmesan if you’d like a creamier/cheesier pesto. If desired, you can thin out the pesto with more olive oil. (Consider, however, that if you’re serving the pesto on pasta, you can thin it with small splashes of reserved pasta cooking water to bring it all together. See notes for details.)
  4. Store leftover pesto in the refrigerator, covered, for up to 1 week. You can also freeze pesto—my favorite way is in an ice cube try. Once frozen, transfer to a freezer bag, then you can thaw only as much as you need later.

12 ways to cook with garlic scapes:

  1. Depending on how much you like (or should I say love?) garlic flavor, you can swap the green stalks for half or all of the basil in your go-to pesto recipe. Blitz in a food processor with Parmesan, pine nuts, olive oil, and salt and pepper.
  2. Fold chopped and sautéed garlic scapes into frittatasomelets, or our best-ever scrambled eggs.
  3. Swap thinly sliced garlic scapes for the scallions in your next batch of crispy fried rice.
  4. Cut garlic scapes into coins and add them to a hot pan to make all sorts of stir-fries.
  5. Mix finely diced garlic scapes into a vinaigrette or green goddess dressing to instantly upgrade your next salad.
  6. Blister whole garlic scapes on the grill for a lightly charred snack or side dish to serve at your next barbecue.
  7. Stir finely chopped garlic scapes, olive oil, and salt into Greek yogurt to make a dip for crackers or crudités. Or, thin the mixture with a spoonful of water and drizzle it over grilled meat or roasted veggies.
  8. Pickled garlic scapes are a revelation. Cut the green shoots into 6-inch pieces and process them the same as pickled ramps.
  9. Sauté sliced scapes to use as a homemade pizza topping. Save any leftover oil from the pan in the fridge for your next salad dressing.
  10. Use the scapes whole in a hearty, warm-weather-friendly braise.
  11. Add a few diced garlic scapes with the chopped onion the next time you make risotto. Feeling fancy? Save one finely sliced green stalk to garnish each bowl.
  12. Mix chopped scapes with room-temperature butter and roll it into a log to make a versatile compound butter. Use it on grilled or pan-fried fish, roasted veggies, and garlicky grilled cheese. Or stash it in the freezer and pull it out a few months down the road to make a truly special Thanksgiving turkey.

PEA PESTO

From this website

This super simple pesto is slightly sweet and utterly uplifting, especially when you’re craving spring. Toss it with pasta, spread it on grilled bread or crostini (it’s great with goat cheese), spoon it over salmon or chicken, or dip crackers into it for a snack. If you’re tossing the pesto with pasta (it makes more than enough for 1 pound of pasta), blanch the peas in the same water you’ll use to cook the noodles (transfer the peas to a bowl of ice water, then cook your pasta in the same pot)—this saves you a bit of clean-up and even adds some nutrients to your pasta. You wouldn’t know this pesto was vegan, but you can certainly add some grated Parmigiano when blending, or top your bowls of pasta with crumbled goat cheese, if you so desire.

Ingredients

  • 2 ¼ cups fresh or frozen sweet peas (1 10-ounce bag frozen peas)
  • 1 large garlic clove
  • 1 cup lightly packed fresh mint leaves
  • ¼ cup toasted pine nuts
  • 2 tablespoons fresh lemon juice
  • Salt and freshly ground black pepper
  • tablespoons extra virgin olive oil

Instructions

  • Bring a medium pot of water to a boil, and season with salt.  Fill a bowl with ice water.  Cook the peas in the boiling water until bright green and tender, about 2-3 minutes.  Transfer to the bowl of ice water to cool (this will preserve their color).  Drain.
  • In a food processor with the motor running (or you can use a Vitamix), drop the garlic clove through the feed tube and finely chop. Add the peas, mint, pine nuts and lemon juice, and season with salt and pepper. Process to a paste. Scrape down the sides. With the machine running, drizzle in the extra virgin olive oil. Taste and season with additional salt, pepper and/or lemon juice, if needed.

Notes

Do Ahead: The pesto can be refrigerated for up to 3 days.

Tips:

  • You can make the pesto in a food processor or Vitamix.
  • Boiling the peas then shocking them in ice water preserves their bright green color. If you want to omit this step, you can simply defrost the peas at room temperature!
  • This pesto is naturally vegan, but you can add grated parmesan cheese, if you prefer.
  • You can swap out the fresh mint for basil.
  • Serve the pesto on Maple Roasted Salmon, chicken, grain bowls, pizza or crostini. It also makes for a lovely dip with crackers!

Strawberry, Fennel, and Arugula Salad

By Deborah Katz

Serves 4 | Prep Time 15 minutes | Cook Time 0 minutes

Variety isn’t just the spice of life; it will also keep you from falling into a food rut. People often tell me that they love salad but get bored with the same old version they always make. This disenchantment can lead folks away from the greens their bodies really need. If that sounds like you, let this salad serve as a springboard for endless seasonal variations. Eating with the seasons isn’t just a catch phrase. Each season brings new foods just hitting their peak; in this case, strawberries and arugula, some of the welcome early harbingers of the spring. In addition to having an incredibly sweet taste, strawberries have anticancer and anti-inflammatory properties. Plus, when combined with mint and a lemony balsamic vinaigrette, they make for a salad that feels like Pop Rocks going off in your mouth.

Instructions

Put the arugula, fennel, strawberries, and mint in a large bowl and toss gently to combine. Drizzle the vinaigrette over the top and toss again. Scatter the almonds over the top.

Place a small skillet over low flame and add almonds. Toast, stirring often, until slightly golden and nutty smelling, about 2 minutes. Remove to a plate and set aside.

COOK’S NOTE: A mandoline (no you can’t strum it) is a handy kitchen tool that allows you to slice vegetables to a uniformed thickness—and perfect for the fennel in this recipe. There are many inexpensive hand- held models available at kitchen stores and online.

STORAGE: If you must store the salad, don’t add the dressing. After combining the greens, fennel, strawberries, and mint, store them in an airtight container in the refrigerator for 1 day at most

Green Beans with Tarragon

The combination of freshly steamed green beans with a tarragon is easy and deliciuos

INGREDIENTS

  • 1 pound green beans, trimmed
  • 1 tablespoon unsalted butter
  • 1 1/2 teaspoons fresh tarragon, finely chopped
  • 1/2 teaspoon garlic powder
  • salt to taste
  • ground black pepper to taste

INSTRUCTIONS

  1. Fill a 3 quart sauce pan approximately ½ full with salted water and bring to a boil.
  2. Drop trimmed green beans into the water and bring back up to a boil. Cook gently for 5-6 minutes or until tender.
  3. Drain the green beans and return to the pan, adding butter, chopped tarragon, garlic powder, salt and pepper. Stir to melt the butter and combine. Serve immediately.

THE MOST AMAZING ROASTED ARTICHOKES

  •  prep time: 15 MINUTES
  •  cook time: 45 MINUTES
  •  total time: 60 MINUTES
  •  yield: 6 SERVINGS 1X

DESCRIPTION

These roasted artichokes are easy to make and full of the best lemony, herby, garlicky flavors.  See dipping sauce ideas below.

INGREDIENTS

  • 3 fresh artichokes
  • 2 large fresh lemons, juiced
  • 2 tablespoons olive oil (or melted butter)
  • 6 cloves garlic, peeled and roughly-chopped
  • fresh rosemary (plus additional fresh thyme, oregano, or sage, if you’d like)
  • coarse sea salt and freshly-cracked black pepper

INSTRUCTIONS

  1. Heat oven to 400°F.
  2. Use a knife to slice off the bottom 1/2-inch (or more, if you’d like) of the artichoke stems, and the top 1 inch of the artichoke globes (the leaves on top).  Remove and discard any small leaves toward the bottoms of the stems.  Rinse the artichokes with water.
  3. Slice the artichokes in half vertically.  Use a spoon to scoop out the fuzzy “choke” in the middle of the artichoke.  Then use kitchen shears to trim about 1/4/-inch off the pointy tips of each of the artichoke leaves (so that they don’t poke you when you eat them).  Rub a lemon wedge all over the entire surface of each artichoke half, to prevent browning.
  4. Place the artichoke halves in a baking dish or on a baking sheet cut-side-up.  Brush the cut sides of the artichokes evenly with the olive oil.  Then fill the cavities evenly with the garlic, followed by a few small sprigs of the fresh herbs.  Season with salt and pepper.
  5. Flip the artichokes over, using the herbs to help hold in the garlic, so that they are cut-side-down.  Brush the tops of the artichokes with oil, and season with salt and pepper.
  6. Bake uncovered for 15 minutes.  Then remove and cover the pan with aluminum foil, and bake for an additional 25-35 minutes, or until the artichokes are tender and the leaves pull off easily.
  7. Place the tray on a cooling rack.  Carefully remove, discard the herbs (or stir them into your dipping sauce for extra flavor), and drizzle the artichokes with extra lemon juice.
  8. Serve the roasted artichokes warm with your desired dipping sauce.

Lemony Garlic Fava Beans

INGREDIENTS

  • 1 kg/2 lbs shelled fava beans, fresh or frozen (about 2.6 kg/5 lb fresh with pods)
  • 1/2 c olive oil
  • 1 head garlic or chopped green garlic
  • 1 tsp salt, plus more to taste
  • 2 c chopped cilantro/coriander leaves
  • 1-2 lemons

INSTRUCTIONS

  1. Boil the fava beans until the skin easily pierces with your fingernail. This will vary depending on the beans, 1-15 minutes, fresh tends to need longer. Transfer to an ice bath or a medium-sized bowl.
  2. In a large skillet set over medium-low heat, add olive oil, garlic, salt and fava beans. Cook, stirring frequently, until fully cooked through and flavorful, about 10-15 minutes. If at any point the garlic or fava beans are sticking to the pan, add 1/4 c of water to deglaze.
  3. Remove from the heat and stir in the cilantro/coriander leaves. Squeeze lemon over the top, combine, and adjust seasoning.
  4. Transfer to a serving platter to marinade the flavors and cool completely. You can also reserve in an airtight container and serve the next day. Take it out of the fridge 30-60 minutes ahead of time to allow to come to room temperature.
  5. Serve with pita bread.

ROASTED ASPARAGUS SOUP with Pistachio Cream by Deborah Katz from “Healthy Mind Cookbook”

Makes 6 servings

Prep – 10 minutes

Cook Time – 20 minutes

PISTACHIO CREAM

1 cup water or stock

1 cup shelled pistachios

1 TBS chopped mint

2 tsp freshly squeeze lemon

SOUP

2 bunches of asparagus (about 2 pounds) tough ends snapped off, remain stalks peeled

3 TBS extra-virgin olive oil

Sea salt

1 small yellow onion, diced

2 leeks, white part only, chopped

1 Yellow potato, peeled and diced

2 cloves garlic, chopped

6 cups Magic Mineral Broth or store bought stock

INSTRUCTIONS:

Preheat the oven to 400 degrees

To make the pistachio cream, put the water pistachios, mint, lemon juice, and 1/4 teaspoon of salt in a blender or food processor and process until smooth and creamy. Taste; you may want to add a bit more salt.


Cut off the asparagus tips and put the stalks and tips on a rimmed baking sheet in a single layer. Drizzle the asparagus with 1 tablespoon of the olive oil and sprinkle with 1/4 teaspoon of salt. Toss evenly to coat. Bake for 8 to 10 minutes, until tender. Remove the asparagus tips from the baking sheet and reserve for garnishing the soup.

Heat the remaining 2 Tablespoons of olive oil in an 8-quart pot over medium heat. Add the onion, leeks, and a pinch of salt. Sauce for 4 minutes, then add the potato and a generous pinch of salt. Stir occasionally, allowing the potatoes to soften and the onion to turn golden. Add the garlic and sauté for 30 seconds. Pour in 1 cup of the broth and deglaze the pot, stirring to loosen any its stuck to the pot. Add the remaining 5 cups of broth and bring to a boil. Decrease the heat to low and simmer for 5 minutes.

In batches, puree the soup in a blender, adding the broth first, then the vegetables and asparagus. Blend until velvety smooth, about 2 minutes. If the soup is too thick, add more broth 1/2 cup at a time. Return the soup to the pot and gently reheat. Taste: you may want to add a pinch of salt or a squeeze of lemon.

Stir 1 cup of the pistachio cream into the soup. Ladle the soup in to bowls and garnish with the reserved asparagus tips. 

COOKS NOTES:

For an ultra smooth velvety texture, go one step further: strain through a fine-mesh sieve, using the back of a wooden spoon to push the liquid through. The ends of there asparagus can be stringy, so peeling just the ends will ensure that you have the smoothes soup possible.